Air Fryer Pork Belly
The fine art of Air Frying has come a long way over the past few years. It seems like now you can Air Fry almost everything! Well, this article will do nothing but confirm that assumption, with our brilliantly simple and delicious Air Fryer Pork Belly recipe! You’ll get a beautiful, crispy Pork Belly with succulent and tender Pork meat. All made in the trust Air Fryer in under 25 minutes!
Our Criteria to guarantee getting Crispy Skin on your Pork every time
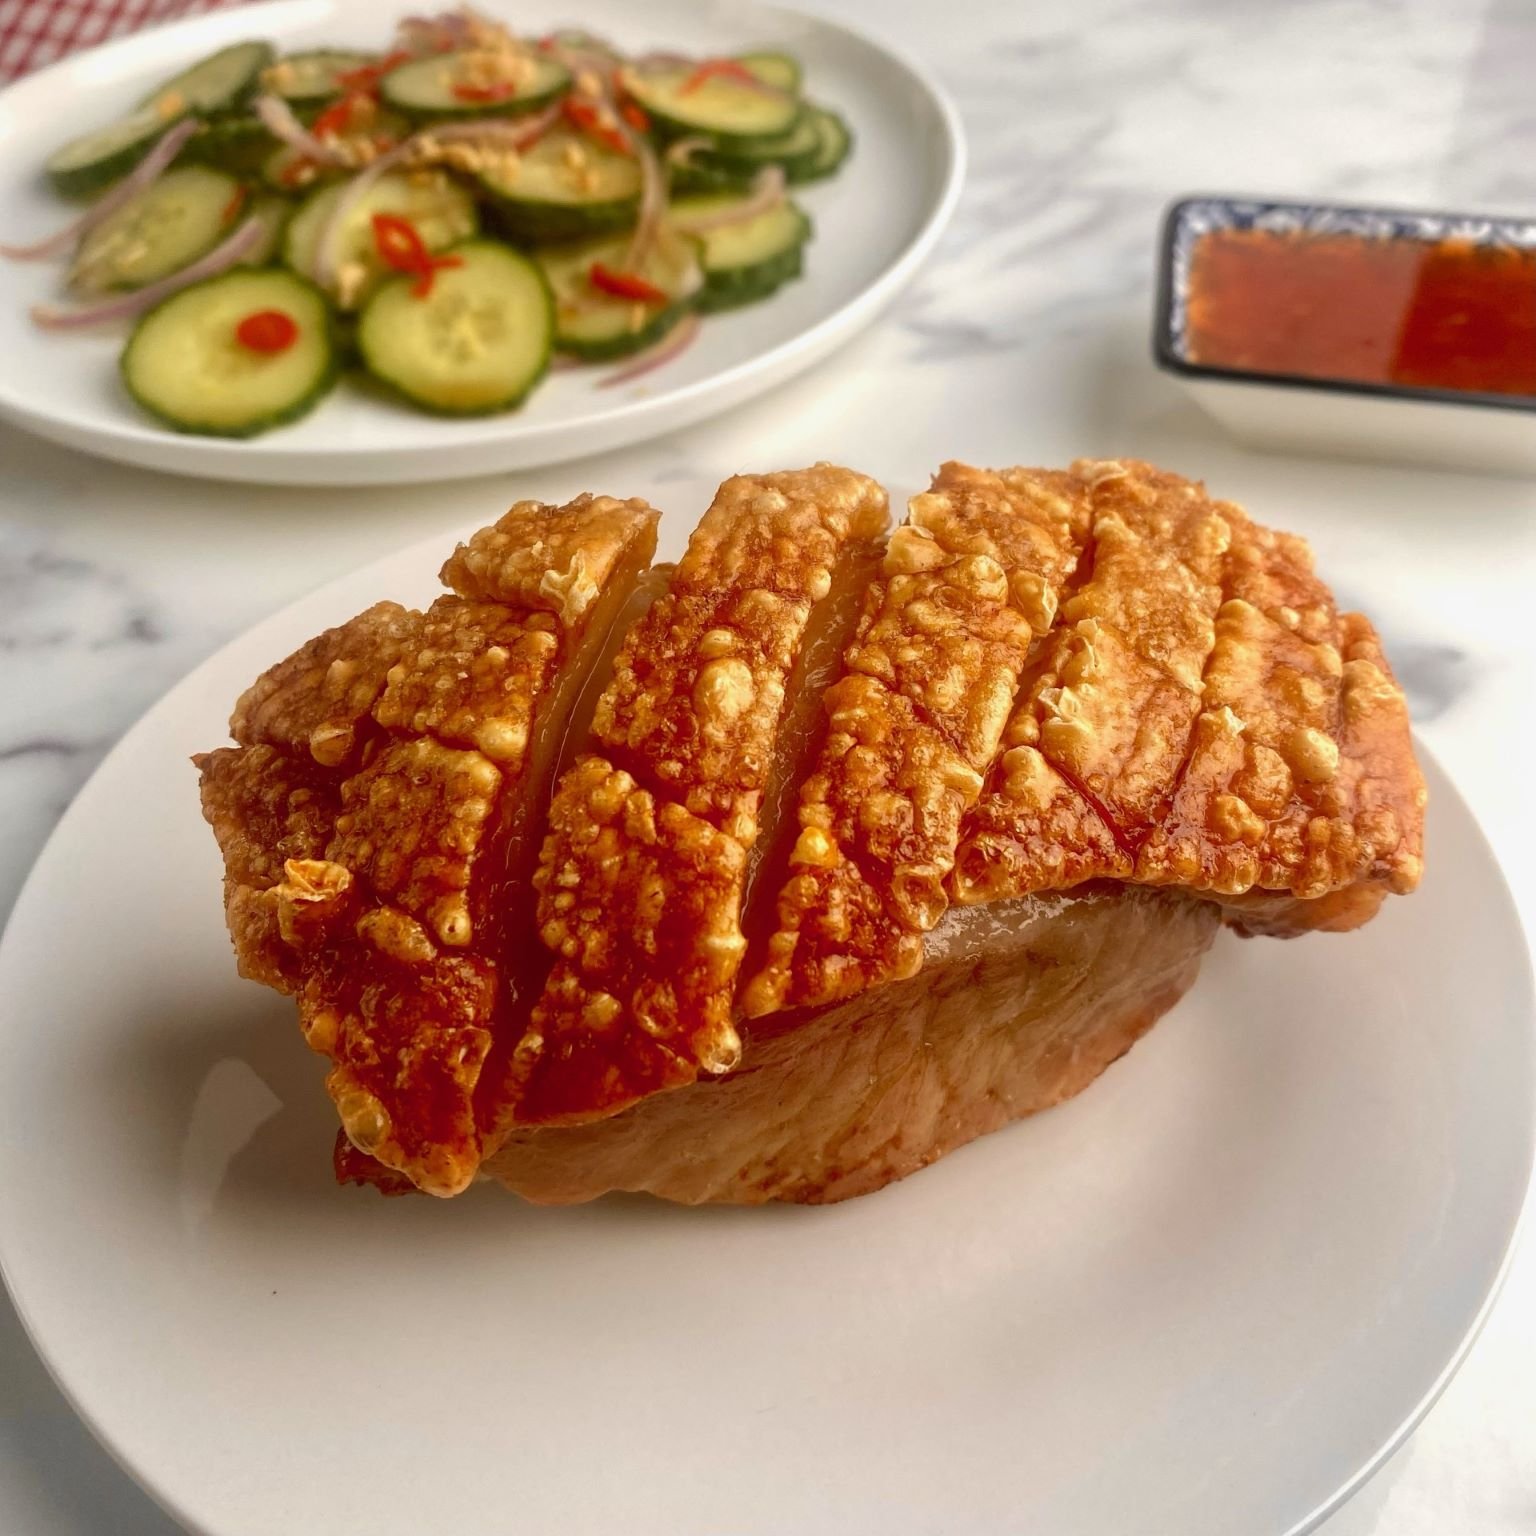
Crispy Pork Skin, otherwise known as Pork Crackling, is one of our favorite things to eat here at Dinnertime Somewhere. We consider ourselves experts in getting Crispy Pork Skin and have several other beautiful recipes on this website dedicated to it, such as our Crispy Roast Pork Shoulder and Crispy Pork Belly with Szechuan Pepper recipe. You could go as far to say most of our Pork recipes are centered around crispy skin!
For all our Pork recipes we’ve nailed the secrets to perfecting a beautiful, Crispy Skin every time. Our Air Fryer Pork Belly recipe is no exception to this either. There are four key criteria:

1. Salt the Skin liberally and often
Salt extracts moisture, and moisture is what prevents the skin from going crispy. By applying a liberal amount of Salt to the skin, the moisture will be extracted from it. You can see it happen in real-time. The Salt will absorb into the skin and droplets of moisture will begin to appear on the surface of the skin
Pat down the moisture to remove it and add more Salt the skin. Doing this a few times before you end up cooking the Pork will ensure as much moisture from the skin has been removed
2. Score the skin into smaller pieces with a very sharp knife
The large surface area of the Skin makes it challenging to get the entire piece crispy. When the Skin starts to cook, the outsides edges are the first to begin to crisp up, and gradually the skin will crisp up closer toward the center. The challenge here, however, is by the time the center starts to crisp up, the outsides will be burnt
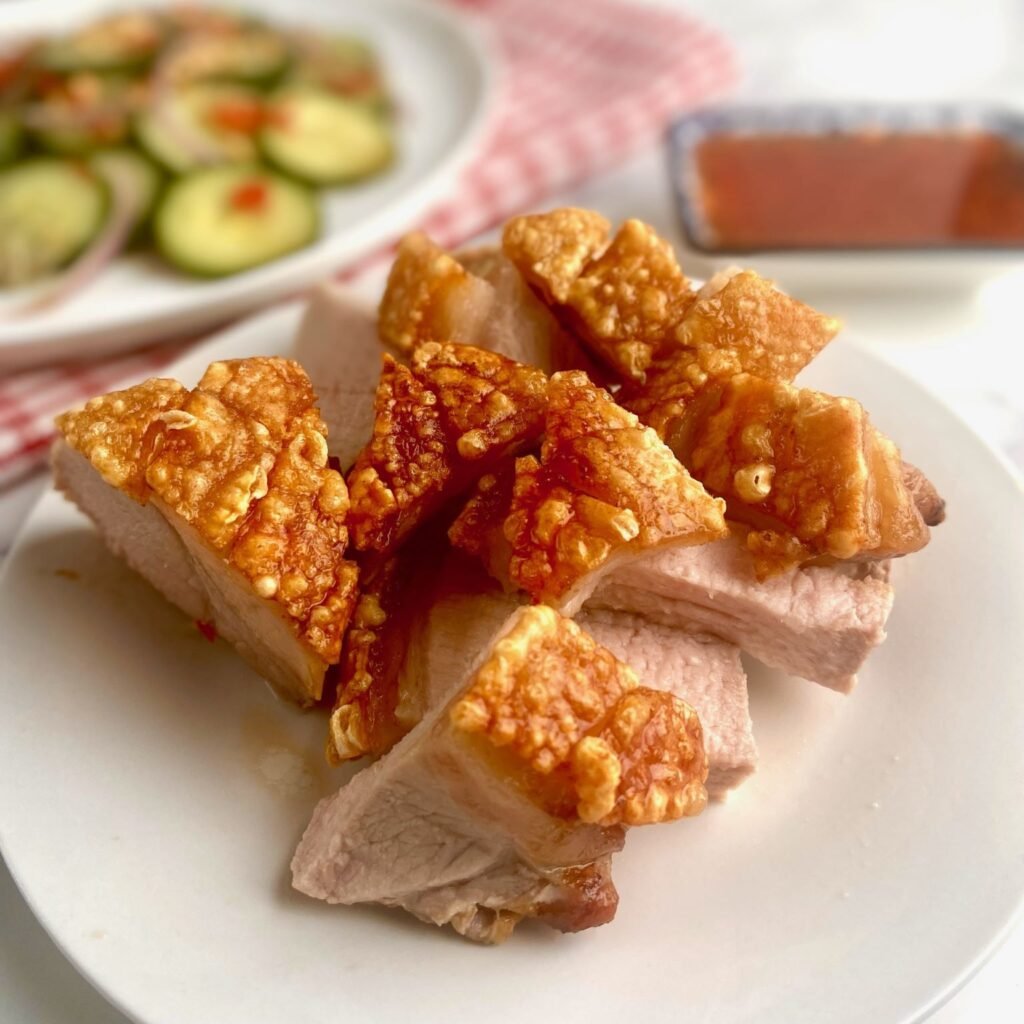
To solve this challenge is quite easy. Simple break up the surface area of the skin by slicing it with a very sharp knife. Slice several cuts across the entire surface of the skin, turn it around 180 degrees and repeat, to form beautiful diamond shapes
Not only does this look pretty, but it is creating lots of gaps in the overall surface area. Each individual ‘diamond’ will start to crisp up at the same time. So, you’ll have an even crisping up of the skin as it cooks
3. Refrigerate the Pork, exposed, for at least 48 hours before cooking
Once you’ve salted and scored the Pork skin, place it on a large plate and leave it in the refrigerator completely uncovered for at least 2 days. This step is critical, as it will dry out the skin a huge amount. You will be able to notice a significant different in the skins color and texture after 2 days
While this step does require a lot of time, it is a critical step that we highly recommend following. Our of all the steps, in our opinion it is the most critical for guaranteeing Crispy Skin Pork
4. Add a generous amount of good quality Butter to the skin right before cooking
This step is less critical, as we’ve achieved great results with and without applying Butter. All you need to do is spread a decent amount of Butter over the skin right before you’re ready to cook it. Ensure some of the butter gets in between the knife cuts you’ve made on the skin
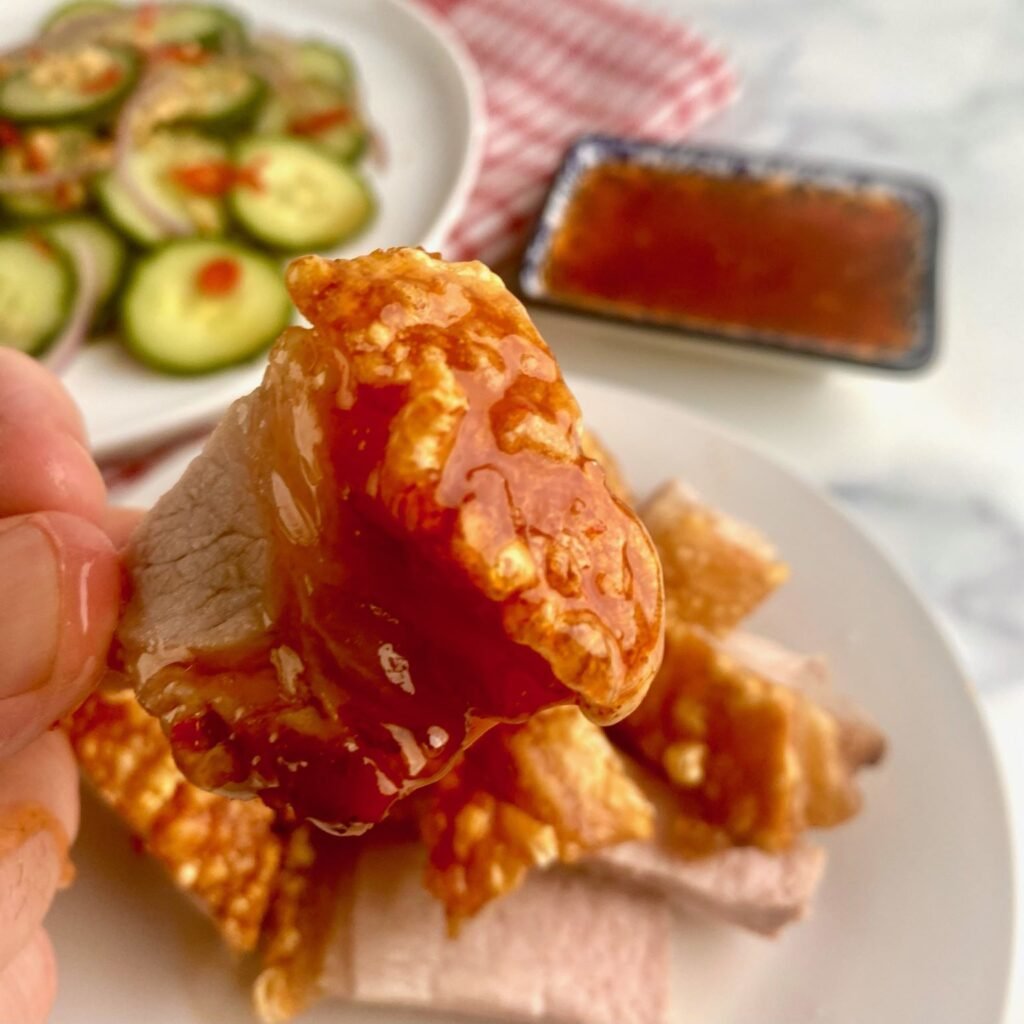
Use good quality butter too, please do not use any butter spread or margarine or anything like that. The Butter will add fat, which, when melted adds a beautiful glaze to the skin which will crisp up. It also adds more flavor because we all know Butter tastes great on everything!

5. Cook on a high temperature, the highest setting you have on your Air Fryer
The final step is to ensure you’re Air Fryer is blasting with heat when you add the Pork. The high temperature will immediately begin to scorch the skin, which is what we want. You will begin to hear the skin blister and pop about 5 minutes into the cook. This is a good sign, and means your Air Fryer Pork Belly is going to have the most luscious, crispy skin imaginable
After about 12 minutes, check the Pork. By this stage the skin should have crisped up and formed into a beautiful crackling. The inside of the Pork will not be cooked at all, so drop the temperature down to around 150F and continue to roast until the inside is cooked. Depending on the size of the Pork it could be another 10 – 20 minutes
Air Fryer Pork Belly cooks in a fraction of the time it would take to make the same dish in the Oven
A huge benefit of Air Frying dishes is they take a fraction of the time of Oven roasting. The Air Fryer will immediately come up to heat, so you don’t need to wait around for 10 – 15 minutes for your Oven to hit that high temperature
Because the cooking area in the Air Fryer is much smaller than an Oven, it will cook a lot quicker. This is great, however the only drawback being you will not be able to put a huge chunk of Pork in there. For our recipe we’ve used about 1 lb. of Pork, and it took about 25 minutes to cook to completion
This recipe will work on multiple cuts of Pork provided the skin hasn’t been removed
A big shock to us when we first moved to the US was how many cuts of Pork have the skin removed. This is not the case with Pork in Europe and Australia! Pork Loin, Pork Shoulder, Pork Butt, they all are generally sold at grocery stores and butchers with the skin intact
Achieving that wonderful crispy skin on Pork is not a technique that is solely connected to the Pork Belly. You can follow this exact same recipe for similar sized cuts of Pork Loin, Shoulder, or Butt if you’re able to get them with the skin on. We highly recommend it too, the best part of a beautiful piece of Roast Pork is that lovely, crispy skin!
Here are some lovely side dishes to pair with this wonderful Air Fryer Pork Belly dish
On it’s own the Air Fryer Pork Belly is a great appetizer. Cut it into individual pieces and serve it alongside a big bowl of sweet sauce such as Sweet Chili and you’ll be eating very well!
For a more substantial meal however, we recommend serving the Crispy Pork with some lighter, refreshing sides and salads. Roast Pork is quite a rich dish, so the lighter sides are a great contrast and help achieve a more balanced meal overall. Here are a few of our favorite sides we’d recommend pairing with your Air Fryer Pork Belly dish:
- Asian Cucumber Salad
- Chinese Garlic Broccolini with Chili
- Garlic Lemon Broccoli with Chili
- Tabbouleh Salad with Couscous
Recipe Details
2 – 4 people
20 minutes (for best results, leave Pork in refrigerator for 48 hours prior to cooking)
25 minutes
45 minutes
Air Fryer Pork Belly Recipe
Ingredients
- 1 lb. Pork Belly (you can substitute for Pork Loin if you like)
- 1 tbsp. Butter
- Salt
Instructions
- Prepare the Pork by scoring the Pork Skin with a sharp knife. Make cuts about ½ inch apart over the skin. Turn the Pork 180 degrees and repeat to form a lovely diamond pattern of cuts
- Add a liberal amount of salt to the skin and then place in the refrigerator for at least 48 hours to dry the skin out
- When ready to cook, remove the Pork from the refrigerator. Rub the Butter over the top of the skin, trying to get some of the butter in between the knife cuts you made earlier. Add another generous amount of Salt to the skin
- Place the Pork in your Air Fryer on it’s highest temperature (typically around 400F – 450F). Roast the Pork for about 10 minutes until the skin has blistered and turned crisp. It is advisable to check the skin every 5 minutes or so to avoid burning it
- Once the skin is cooked, drop the heat down to 150F and cook for a further 10 – 15 minutes until the internal temperature of the pork is 135F. Remove from Air Fryer and set aside to rested
- Once rested, carve, and serve alongside some sweet sauce (Sweet Chili or Apple Sauce are great choices)
That’s our recipe for guaranteed Crispy Air Fryer Pork Belly! We hope you’ve enjoyed it and are tucking into some deliciously crispy Pork!
Happy Cooking!