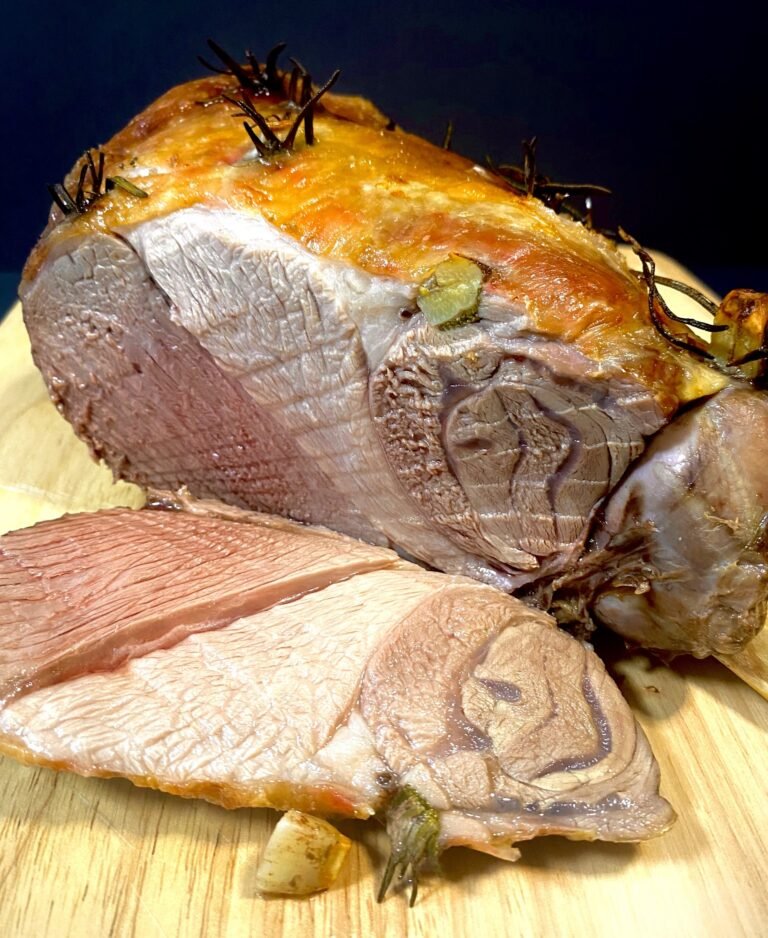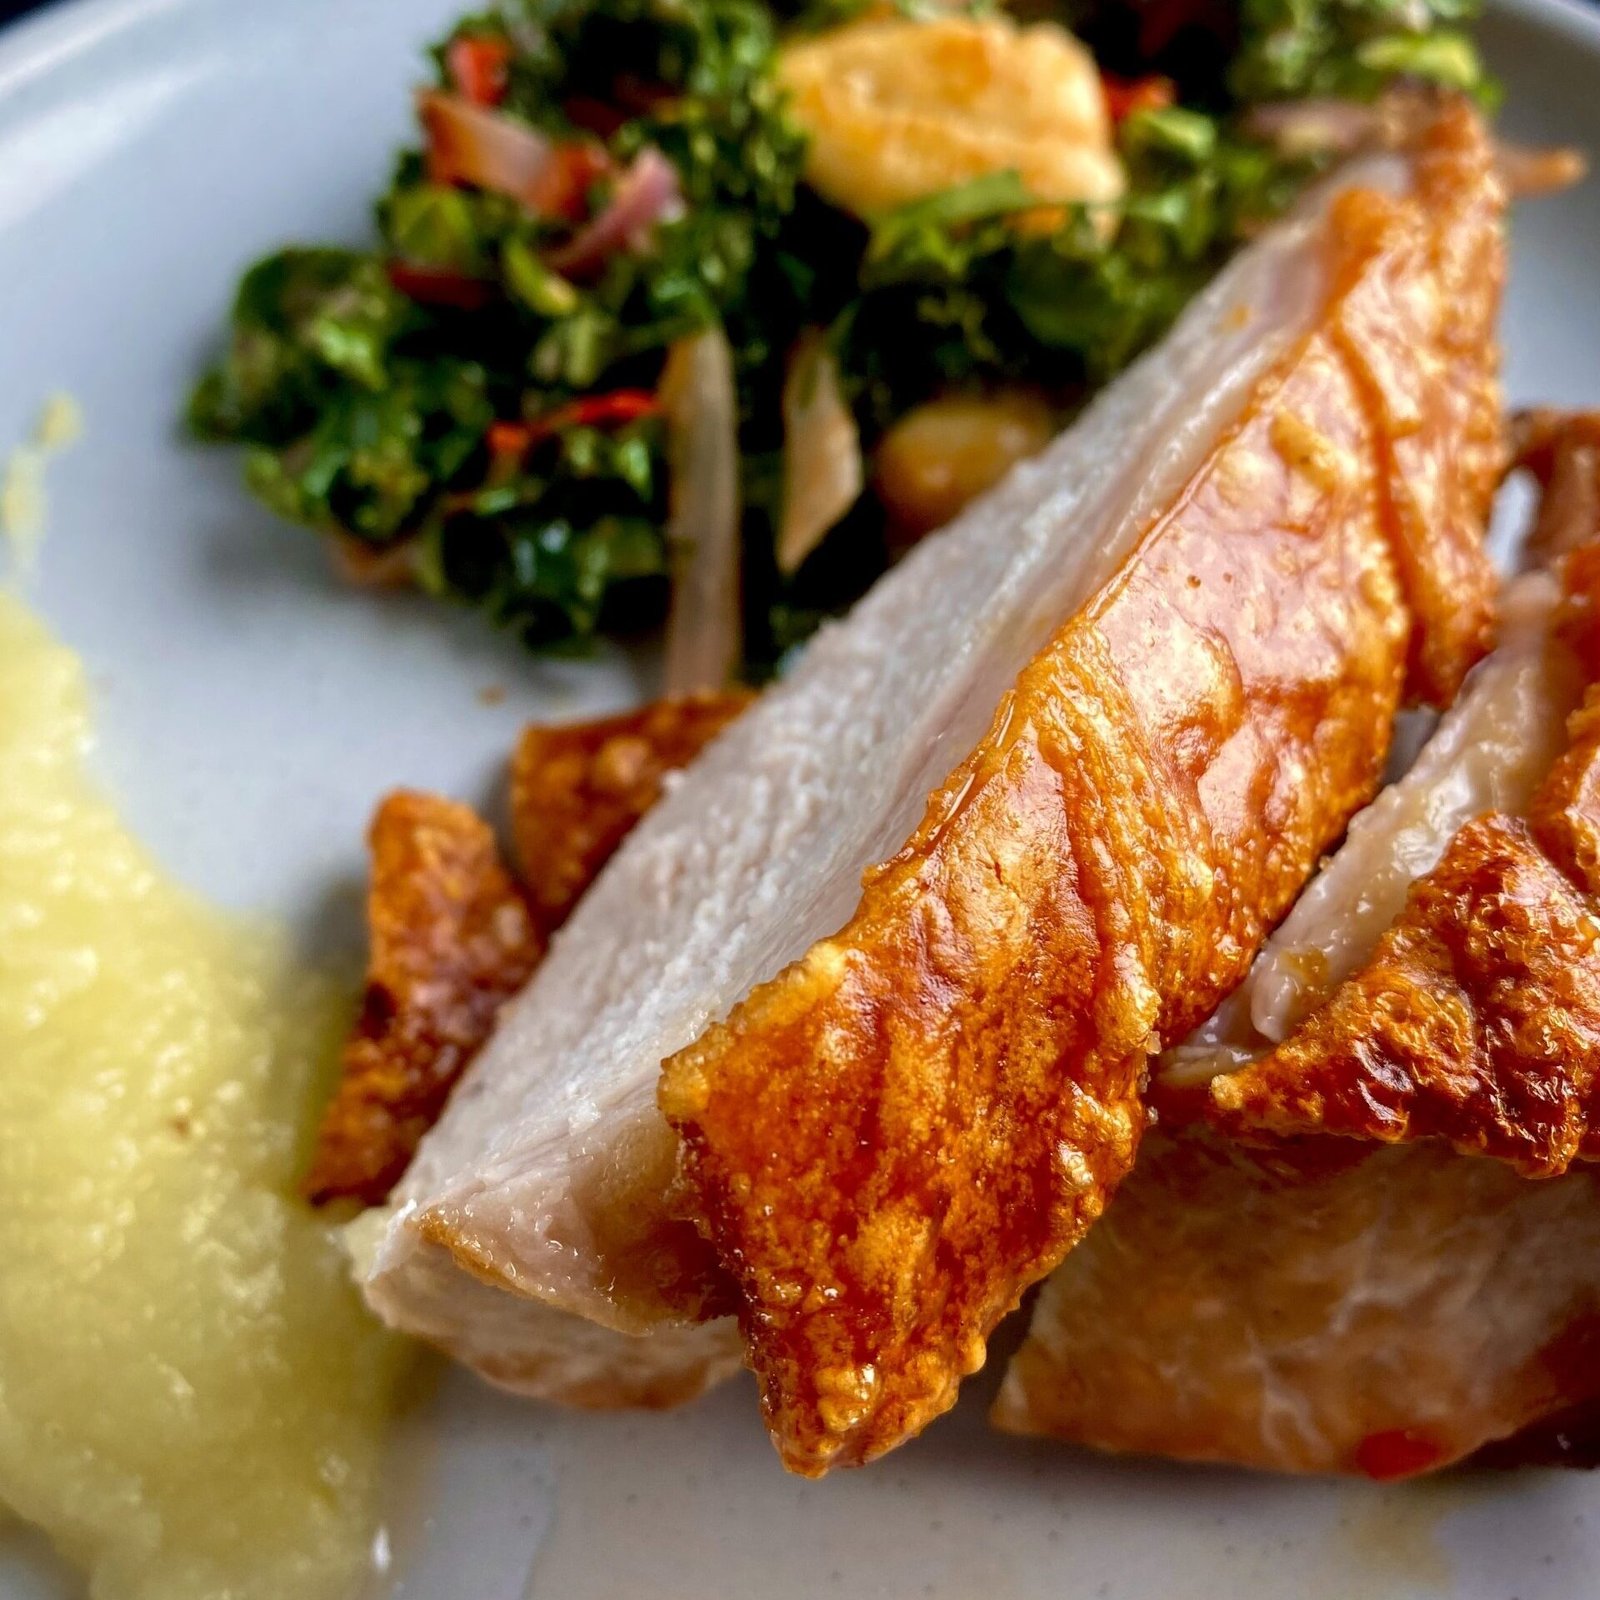
Crispy Roast Pork Shoulder
One of the biggest food crimes in the US is the lack of appreciation for a good piece of pork crackling. Growing up in Australia with their heavy influence from the UK you learn to love a good crispy piece of pork crackling. The classic Crispy Roast Pork Shoulder is a staple dish for Sunday Lunch or Dinner with the Family. Surprisingly, we found it much more uncommon in the US to find a good piece of roasting pork with its skin still on in the supermarkets. They can be found however, so this recipe may require a little bit of digging around or politely asking your friendly local butcher to find you a lovely piece of pork with the skin on
What cut of Pork is best to roast?
Pork Shoulder is our recommended cut of Pork to roast as it’s fatty and stands up exceptionally well to a longer cook than a Pork Loin, which tend to dry out a lot easier. You could also cook with a Pork Butt, it’ll work just as well. The key to success, as always, is to monitor the internal temperature. We’d highly recommend an oven safe digital thermometer so you can set the desired temperature and let the thermometer tell you when it’s ready

The Secret to getting a perfect Crispy Skin every time
We have conducted years upon years of trial and error to perfect a Crispy Skin Roast Pork Shoulder. What this means is, we’ve eaten a lot of Roast Pork! Someone has to do it you know! I know there are lots of tips and tricks out there to achieve the perfect crackling, but this is the one that we assure you will work every time. There is really 3 steps to perfect a beautiful crispy skin every time
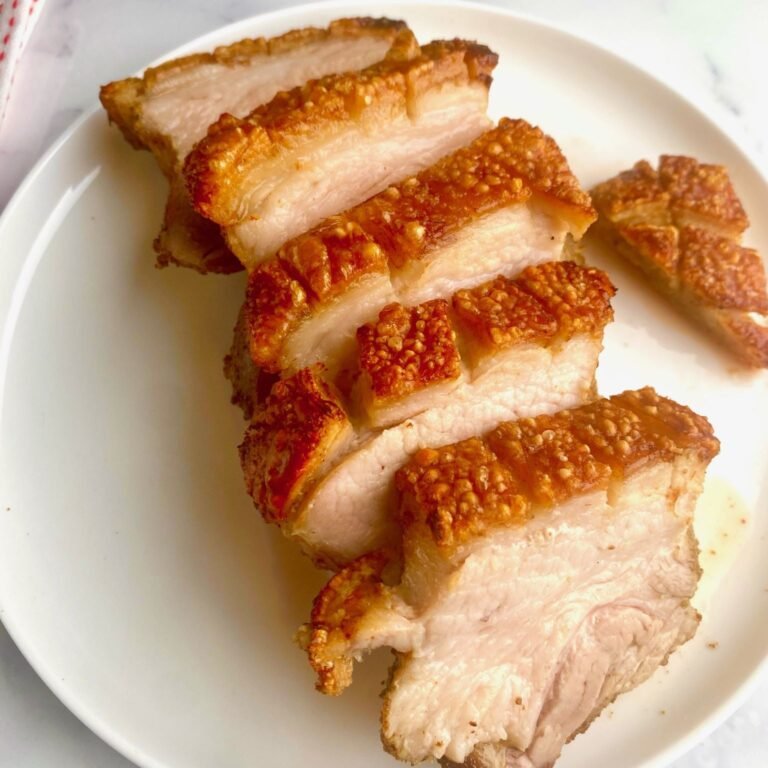
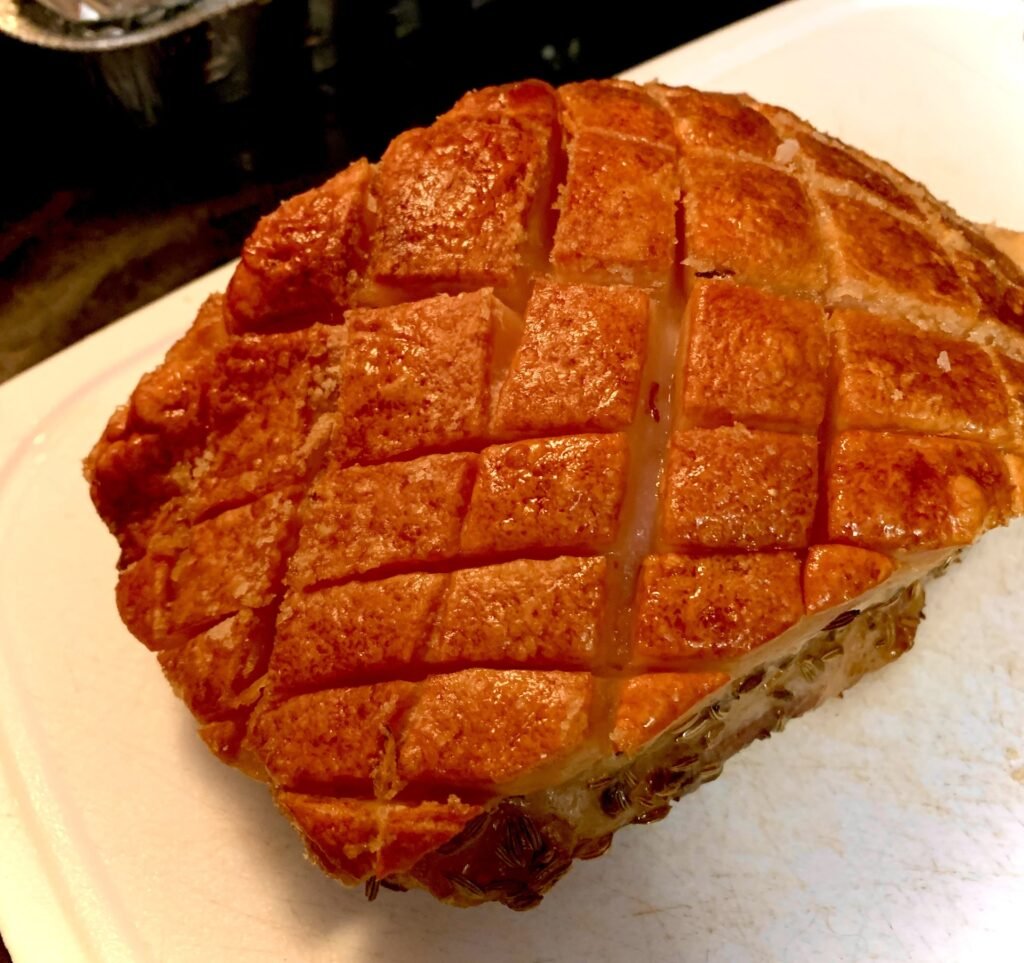
Step 1: Score the Skin in a Diamond Pattern approximately 1 inch apart
With a sharp knife, cut the skin diagonally to form beautiful diamonds across the entirety of the skin. See the picture below for how to cut it. What this does is maximizes the surface area for the skin to attract heat. If you do not score the skin what typically happens is the outside of the skin will crisp up, however the middle of the Roast will not
By scoring the skin you are essentially creating dozens of mini surfaces for the skin. So instead of simply crisping up around the outside, each individual ‘diamond’ is considered its own skin, and will crisp up individually. It’s a surefire technique for success. Just make sure you are using a very sharp knife and do not cut into the flesh when you are cutting!

Step 2: You must dry out the skin before cooking it. Do so by Salting and Refrigerating for at least 48 hours
There is a load of excess moisture in the Pork skin, which makes it difficult for the skin to crisp up. To remove as much moisture as possible there are two great tricks. The first is to liberally add salt to the skin once you’ve scored it. Ensure that you get all that salt in between the cuts you’ve created too. The Salt will draw out a lot of excess moisture from the skin, leaving it lovely and dry
The second technique to maximize drying out the pork is to leave it in the refrigerator after you’ve scored and salted it for at least 48 hours, uncovered. The cold of the refrigerator dries out the skin unbelievably well, and does require at least 2 days for the maximum effect
Step 3: Initially Roast the Pork on a very high heat
Once your Pork goes into the Oven the immediate step is to blast it with high heat. Anywhere between 450 – 500 degrees (250 C) is the sweet spot. The immense heat will begin to char the skin immediately. Do this for 20 – 25 minutes and the skin will begin to blister and crisp up amazingly. You then turn the heat down to a roasting temperature to cook the inside of the meat. The skin will continue to crisp up even further, without burning
So, there are the 3 key steps to ensure an amazing Crispy Roast Pork Shoulder every time. Give it a go and let us know in the comments below how it went!
Recipe Details
4 – 6 people
1 day (overnight)
1.5 – 3 hours
1.5 – 3 hours cooking + overnight prep
Crispy Roast Pork Shoulder Recipe
Ingredients
- 6 – 8 lb. Pork Shoulder, Skin On
- 2 tbsp. Unsalted Butter
- 4 tbsp. Salt
Instructions
- Begin by scoring the skin of the Pork in a diagonal shape (to form diamond like cuts across the skin). Scoring the skin is critical as it allows more surface area to crisp up during the cooking process. It also ensures the crispy skin is a lot easier to cut and serve
- Salt the skin liberally and then place in the refrigerator overnight. If cooking the same day, try to prepare the Pork in the morning so it has spent at least 4-5 hours in the fridge. We are doing this to dry out the skin. The salt draws out moisture in the skin and the fridge helps with the drying process
- 1 hour before cooking, take your Pork out of the refrigerator to bring up to room temperature. Paste the butter all over the skin and season skin liberally with more salt. This process adds more fat to the skin which helps with an even crispier finish. It’s not a mandatory step, but we find does improve the final result
- Pre-heat your oven to the maximum temperature it can reach. Anywhere between 450 – 500 degrees is ideal then place your pork into the middle of the oven in a large oven proof baking tray
- Cook for 20 – 25 minutes at this high temperature. The purpose of cooking at such a high temperature is to get that skin super crispy. You’ll tell when the skin is done as it will go a lovely darkish, golden-brown color and the skin will be bursting with blisters. At this point, turn your oven down to 180 degrees
- The cook time for the roast pork depends significantly on how large the cut of meat is. Typically allow 15 minutes for each pound of pork. So if your pork weighs 6 pounds it should take 1.5 hours to fully cook. Once your pork reaches an internal temperature of 135 degrees, remove it from the oven and rest for at least 20 minutes. The resting time will increase the internal temperature to around 145 degrees leaving a lovely, succulent piece!
This is a classic roast dish, so it goes very well with some lovely roasted vegetables. Given the high fat content of the pork, you can add potatoes and onions to the baking tray once you’ve dropped the heat to 180 degrees and that lovely fat will coat the vegetables giving them a remarkable flavor!
Of course, what Roast Pork dish would be complete without some delicious Apple Sauce to serve on the side? Check out our super simple and delicious Apple Sauce recipe here
Happy Cooking!