Crispy Porchetta with Fennel and Herbs
For when you want a truly epic roast Pork dinner, you cannot go past the mighty Porchetta. A beautiful piece of Pork that is rolled into a spiral, filled with beautiful, flavored stuffing and finished with a lovely, crispy skin. Porchetta is the king of Roast Dinners and will surely impress with it’s huge flavors and striking visual appeal on the plate. This recipe will show you how to easily make the most delicious Crispy Porchetta with Fennel and Herbs that is guaranteed to please. The flavors are huge, and that Pork skin is ridiculously crispy and flavorsome
This amazing recipe was inspired by the fine chefs at Fallow Restaurant in the UK. They produce some amazing dishes, including a wonderful Porchetta such as this one. We find lots of great inspiration from them and their simple cooking techniques for making delicious food at home
Making this Crispy Porchetta with Fennel and Herbs is a 3 day process
All good things take time, and this saying cannot be truer when it comes to making a Porchetta. There are no shortcuts when making this dish, and it will take you three days to make it. Treat this dish as more of a journey than a quick meal! The good news is that all the steps within the three day process are very easy, and most of the time you’re not doing anything
The 3 days are all about allowing the Pork to become infused with flavors, whether that’s in a brine, or slowly braising away in the oven. So, let’s take you through these three days in a little bit more detail to walk you through how to make this wonderful meal
Day 1: Brining the Pork
The first step in preparing our Crispy Porchetta meal is bringing the Pork. This is a very simple process of submerging the Pork in a heavily salted water, called a Brine. This step allows the Pork to be tenderized, and helps with removing moisture from the Pork skin, allowing it to become super crispy when it is cooked
To create your brine, simply combine Water and Salt and bring the liquid to a boil. The great thing about Brine is you can add more flavors and aromatics to it, allowing these flavors to make their way into the Pork. We add Rosemary, and Thyme, along with some whole Garlic Cloves (you can keep the peel on them) and some Black Peppercorns. Add a bit of Sugar in there too and bring the whole thing to a boil
Once the Brine has boiled, remove it from the heat and all it to cool to at least room temperature. Then, simply submerge your Pork Belly in the Brine in a pot, cover and refrigerate overnight. You want to ensure that the Pork is completely submerged, so using the right sized Pot will help with this. You can always make a bit more Brine if needed
Day 2: Rolling and Braising the Porchetta
This is the day that matters. You are preparing the Porchetta, stuffing it with the most delicious filling and then slowly cooking it until it’s melt-in-the-mouth tender. The first step in this process is to prepare the Pork. First, remove it from the Brine and pat it dry
Then, using a sharp knife, cut it in half lengthways down the very center of the Pork to create two even sides. One critical step in this process is to avoid cutting it all the way through. You want to cut through about 95% of the way, leaving just a little bit still attached at one end. This way, you can fold open the two sides, creating a long strip of Pork that has now doubled in its surface area
This step is important, as it will allow you to much more easily roll the Porchetta, and allows for more layers, which means more opportunities to fill the Pork with that wonderful filling! Take your time during this step and be sure to use a sharp knife as it will make the process a lot easier
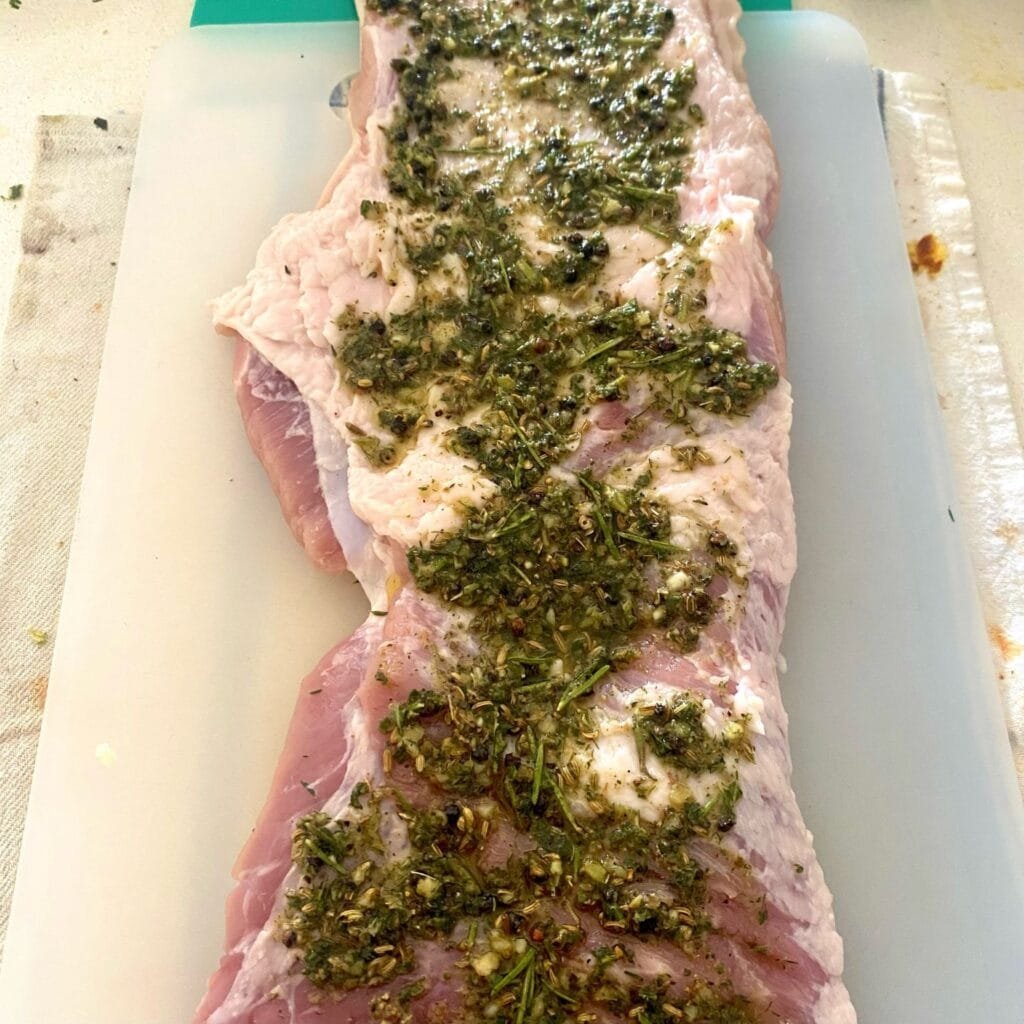
Making the Fennel flavored stuffing
To make the delicious stuffing, all you need to do is combine Fennel Seeds (which should be lightly toasted beforehand), a load of herbs, Garlic, Salt, Black Peppercorns, and Salt in a food processor. Pour in enough Olive Oil to create a thick paste and give it a generous blitz. Make sure the Fennel Seeds and Black Peppercorns are well blitzed to avoid any big chunks making its way into the Porchetta
Once your stuffing is the consistency of a thick paste it is done. You don’t need it to be super-smooth. In fact, having a few chunks of Herbs makes for some great texture in the dish. Then, liberally spread the stuffing mixture all over the Pork using a spoon. Try to cover the Pork evenly, as this will ensure when it’s rolled up that each slice you cut off will be filled with wonderful flavors
The flavor in the stuffing is what makes this Pork truly unique. Fennel is a fantastic pairing with Pork. It just works so well! When combined with a beautiful Herb combination (we used Sage, Rosemary, Thyme, and Oregano) you get the most beautiful flavor
Wrapping up the Porchetta
To wrap the Porchetta, simply roll it up lengthways, starting from the end of the Pork that doesn’t have any skin underneath it. Roll it up like you would a T-Shirt until you form a log, with the skin now forming the outside crust of the Pork
The next step is critical – you must tie the rolled Pork up tightly so that it will keep its shape as it cooks. There are many techniques you can check out on YouTube on how to best do this. However, we’ve found that as long as you get it nice and tight, using lots of knots along the way it’ll be perfectly fine. You will need cooking twine / string to do this
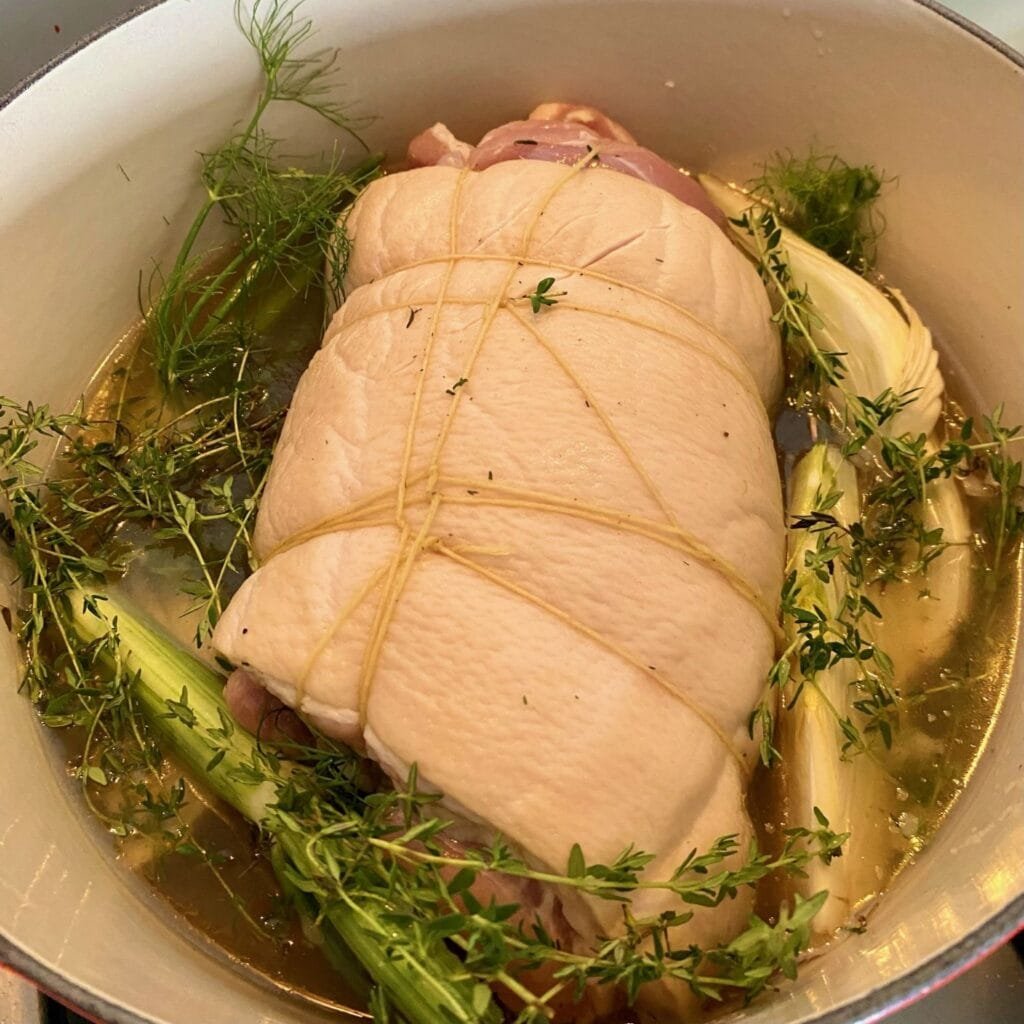
Braising the Pork
Once wrapped, place the Pork into an oven safe dish such as a roasting tray or Dutch Oven. Add Chicken Stock, some Garlic, and Herbs then cover and slowly braise in the oven for 10 hours at 220F / 105C. At the 5 hour mark, turn the Pork so the side that was submerged in the liquid is now exposed
We recommend kicking off this step first thing in the morning, otherwise you may have to turn the Pork super-late! There’s nothing else you need to do during this step but wait. The slow braising process allows the Pork fat to render, and the beautiful meat to slowly cook as it absorbs all those wonderful flavors
Once the Pork is cooked after the 10 hour braise, remove it from the Pot and set aside. You can move straight onto the final step if you are going to eat it immediately. Otherwise, simply refrigerate it and move onto the final step when it’s time to eat!
Day 3: Finishing the Porchetta to get beautiful crispy skin
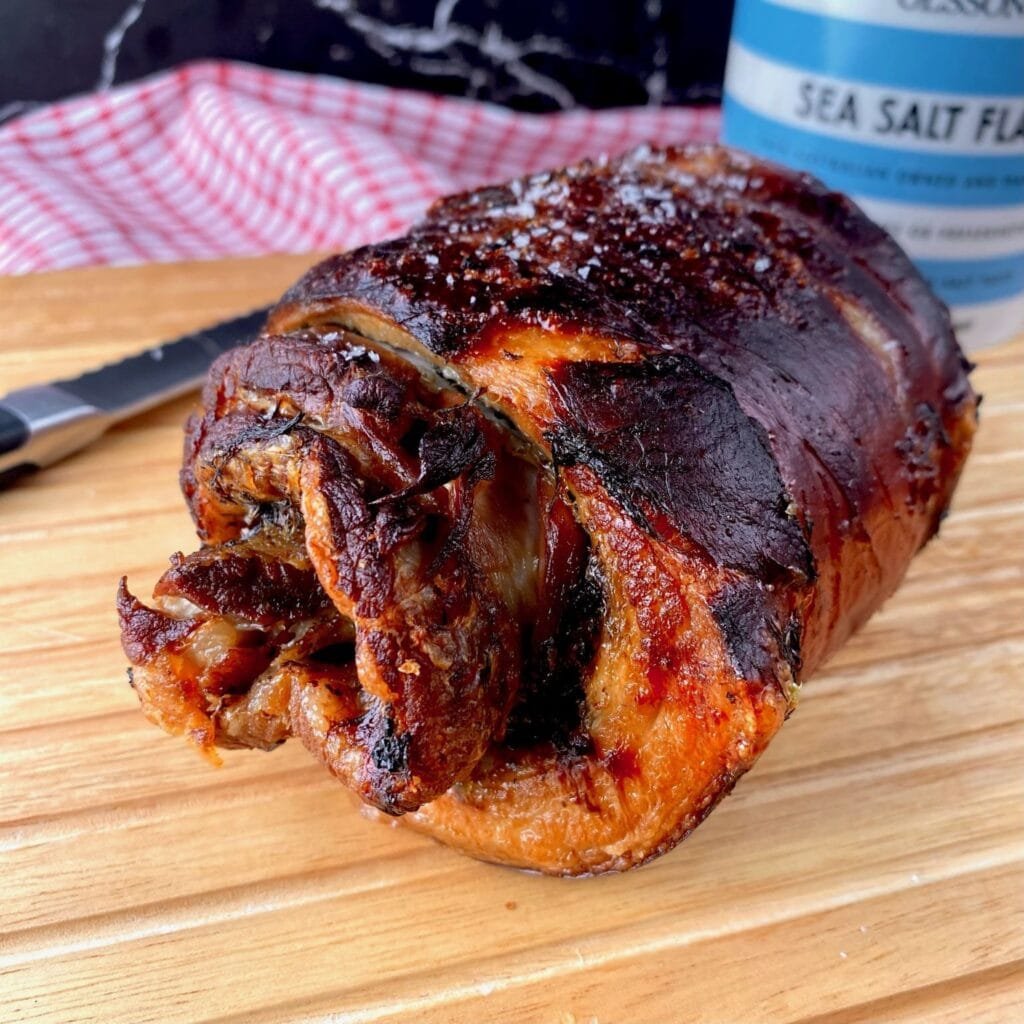
The final day is the simplest, and the best because you finally get to eat this amazing Crispy Porchetta with Fennel and Herbs! The cooking process on the final day only takes about 20 minutes. You want to ensure your Pork has been removed from the refrigerator and is at room temperature before cooking
Crank your oven to a high temperature. I’d recommend cooking it at the highest temperature. Anything above 450F is going to work great. Place the Pork on a wire rack over a sheet pan and then place it in the oven once it’s at that high temperature
Roast the Pork for 20 minutes until the Pork is super-crispy and starting to char slightly. Remember, at this stage the Pork is already completely cooked. This final step is about re-heating the Pork and getting that skin ridiculously crispy
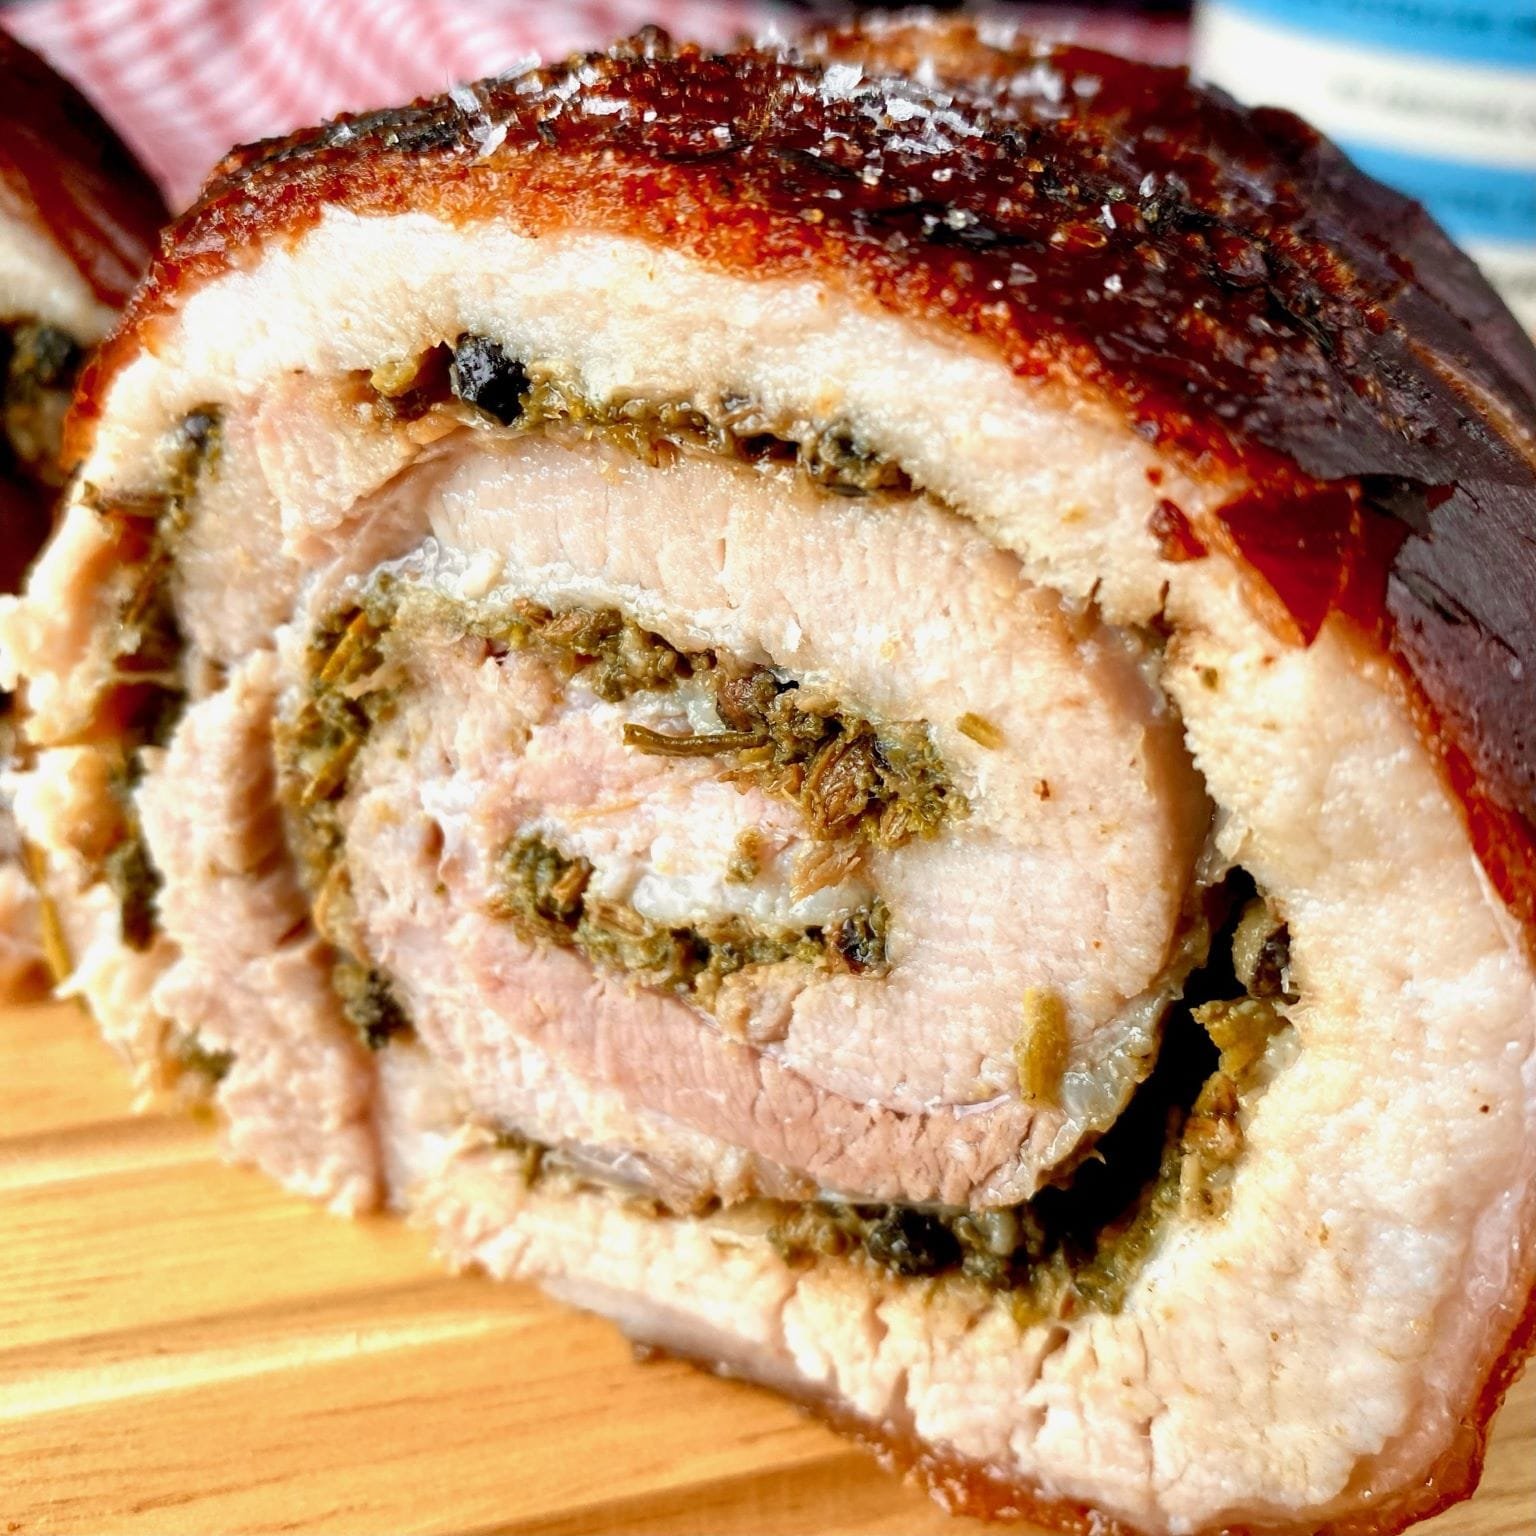
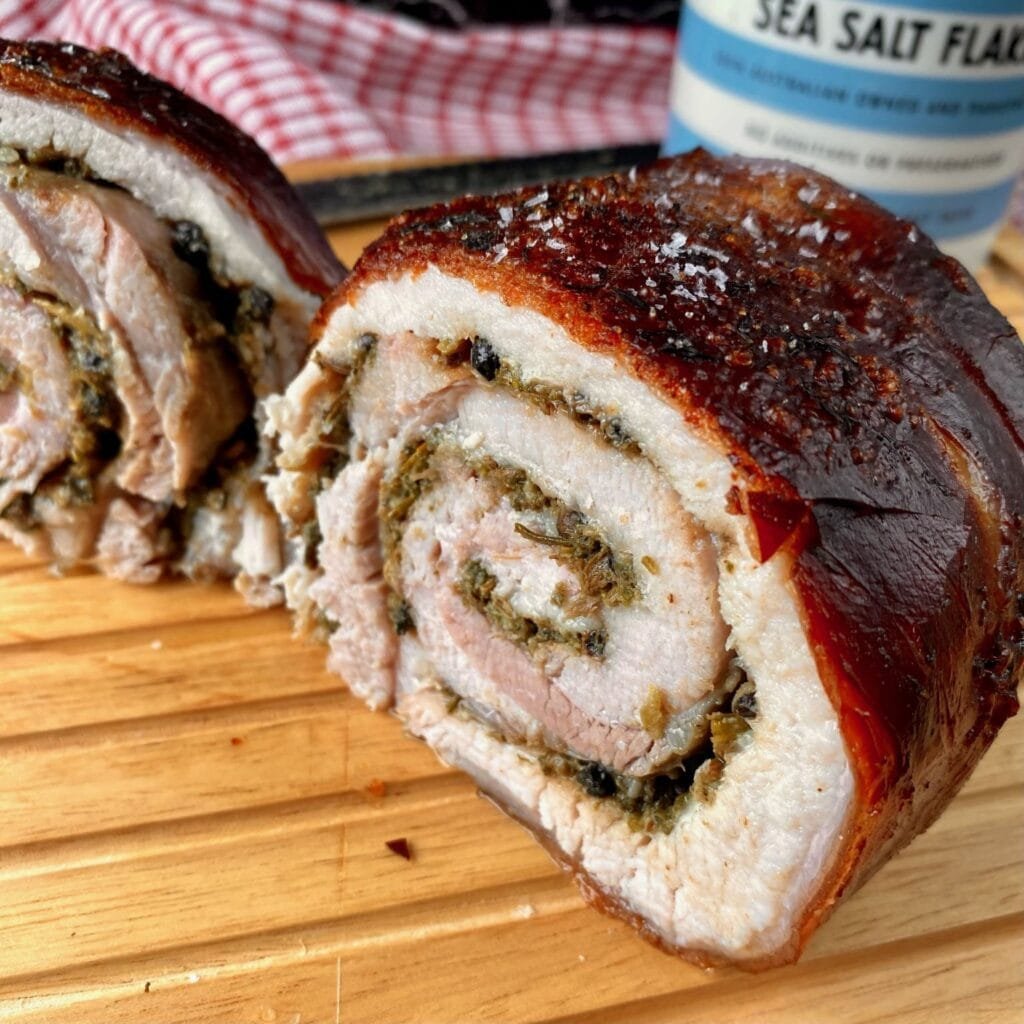
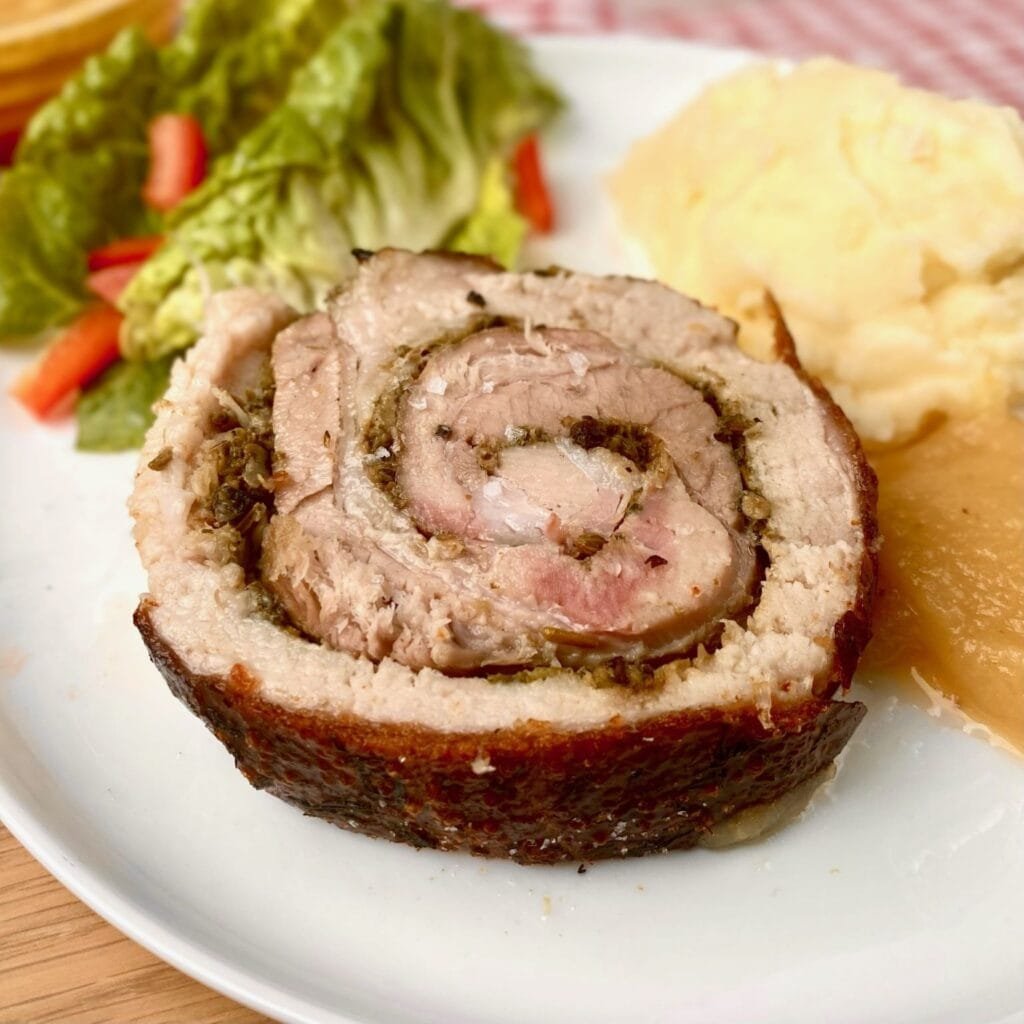
After 20 minutes, remove the Pork from the oven and rest for about 10 minutes before carving. Also remember to cut away all that cooking twine you used to bind the Pork together. Carve the Pork into slices to reveal the beautiful, rolled swirl in the middle. Each layer will have a generous portion of that wonderful Fennel and Herb stuffing that tastes so good with the delicious Crispy Porchetta!
Recipe Details
4 – 6 people
1 day
10 hours
2 days+
Crispy Porchetta with Fennel and Herbs Recipe
Ingredients
- 4 – 5 lb. Pork Belly
Brine Ingredients
- 5 cups of Water
- 4 tbsp. Salt
- 1 tbsp. Sugar
- 1 tbsp. Black Peppercorns
- 4 Garlic Cloves, whole
- 4 Sprigs of Thyme
- 4 Sprigs of Rosemary
Stuffing Ingredients
- 2 tsp. Fennel Seeds, lightly toasted
- 1 cup of Sage
- 1 tbsp. Rosemary Leaves
- 1 tsp. Thyme Leaves
- 1 tsp. Dried Oregano
- 3 Garlic Cloves, peeled
- 2 tbsp. Olive Oil
- 1 tsp. Black Peppercorns
- 1 tsp. Salt
Braising Ingredients
- 4 cups of Chicken Stock (recipe here)
- ½ a Fennel, roughly chopped
- 4 sprigs of Thyme
- 4 sprigs of Rosemary
Equipment needed: Food Processor. Cooking Twine / String
Instructions
First Day
- Combine all the Brine ingredients into a large saucepan and bring to a boil. Remove from heat and allow to cool
- Place the Pork Belly into a large pot and pour over the Brine. Ensure there is enough to completely submerge the Pork. Cover and refrigerate for 24 hours
Second Day
- Remove Pork from Brine and pat dry. Carefully slice the Pork down the center to double its surface area. Avoid cutting completely through to the other side, allowing you to fold the Pork out into one long strip
- Combine the stuffing ingredients into a food processor and blitz until a smooth paste forms. You may need to add a touch more Olive Oil to help this along
- Generously spread the stuffing all over the Pork and then roll it up, starting from the end without skin on it (so that the rolled Pork will have the skin exposed on the outside)
- Tie the Pork up tightly with cooking twine / string then place in a large pot. Add the Braising Ingredients (so the Pork is slightly submerged), cover and roast in the oven at 220F / 105C for 10 hours, turning halfway through
Third Day
- Once the Pork is cooked you can store it in the refrigerator until ready to cook. Bring it back to room temperature and season the skin with a touch of Salt
- Place the Pork on a wire rack placed over a sheet pan. Roast in the Oven at a high heat (around 450F) for 20 minutes until the skin is crispy. Remove from Oven and rest for 15 minutes. Cut off string before carving
Recipe Notes
- You don’t need any fancy techniques to tie the Pork, just ensure its tightly wrapped so it won’t unfold during the cooking process
- You can use a blender if you don’t have a food processor, however I would suggest grinding the Peppercorns in a Mortar and Pestle prior to blending
This epic Crispy Porchetta with Fennel and Herbs is such a beautiful and tasty dish. I’m sure you will agree that it is well worth the time and effort involved to make this amazing meal
If you’re a big fan of epic, slow cooked dishes such as this one then you’re in luck! We’ve compiled a list of our favorite Slow Cooked Dishes here that you can check out. Here are a few of our favorites from that list:
Happy Cooking!